| [ << ] | [ >> ] | [Top] | [Contents] | [Index] | [ ? ] |
| 15.1 Box Object | ||
| 15.2 Frame Object | ||
| 15.3 LabelFrame Object | ||
| 15.4 Text Object | ||
| 15.5 Bitmap Object | ||
| 15.6 Pixmap Object | ||
| 15.7 Clock Object | ||
| 15.8 Chart Object |
Boxes are simply used to give the dialogue forms a nicer appearance. They can be used to visually group other objects together. The bottom of each form is a box.
| 15.1.1 Adding Box Objects | ||
| 15.1.2 Box Types | ||
| 15.1.3 Box Attributes | ||
| 15.1.4 Remarks |
To add a box to a form you use the routine
FL_OBJECT *fl_add_box(int type, FL_Coord x, FL_Coord y,
                      FL_Coord w, FL_Coord h, const char *label);
|
The meaning of the parameters is as usual. The label is per default placed in the center of the box.
The following types are available:
FL_UP_BOXA box that comes out of the screen.
FL_DOWN_BOXA box that goes down into the screen.
FL_FLAT_BOXA flat box without a border.
FL_BORDER_BOXA flat box with just a border.
FL_FRAME_BOXA flat box with an engraved frame.
FL_SHADOW_BOXA flat box with a shadow.
FL_ROUNDED_BOXA rounded box.
FL_RFLAT_BOXA rounded box without a border.
FL_RSHADOW_BOXA rounded box with a shadow.
FL_OVAL_BOXAn elliptic box.
FL_NO_BOXNo box at all, only a centered label.
The first color argument (col1) to
fl_set_object_color() controls the color of the box, the
second (col2) is not used.
No interaction takes place with boxes.
Do not use FL_NO_BOX type if the label is to change during the
execution of the program.
Frames are simply used to give the dialogue forms a nicer appearance.
They can be used to visually group other objects together. Frames are
almost the same as a box, except that the interior of the bounding box
is not filled. Use of frames can speed up drawing in certain
situations. For example, to place a group of radio buttons within an
FL_ENGRAVED_FRAME. If we were to use an FL_FRAME_BOX to
group the buttons, visually they would look the same. However, the
latter is faster as we don't have to fill the interior of the bounding
box and can also reduce flicker. Frames are useful in decorating free
objects and canvases.
| 15.2.1 Adding Frame Objects | ||
| 15.2.2 Frame Types | ||
| 15.2.3 Frame Attributes | ||
| 15.2.4 Remarks |
To add a frame to a form you use the routine
FL_OBJECT *fl_add_frame(int type, FL_Coord x, FL_Coord y,
                        FL_Coord w, FL_Coord h, const char *label);
|
The meaning of the parameters is as usual except that the frame is drawn outside of the bounding box (so a flat box of the same size just fills the inside of the frame without any gaps). The label is by default placed centered inside the frame.
The following types are available:
FL_NO_FRAMEFL_UP_FRAMEFL_DOWN_FRAMEFL_BORDER_FRAMEFL_ENGRAVED_FRAMEFL_EMBOSSED_FRAMEFL_ROUNDED_FRAMEFL_OVAL_FRAMEAn elliptic box.
The first color argument (col1) of
fl_set_object_color() controls the color of the frame if
applicable, the second (col2) is not used. The boxtype
attribute does not apply to the frame class.
No interaction takes place with frames.
It may be faster to use frames instead of boxes for text that is truly static. See `freedraw.c' for an example use of frame objects.
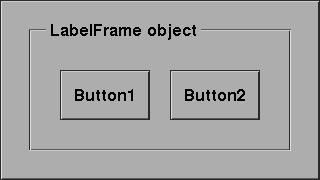
A label frame is almost the same as a frame except that the label is placed on the frame (See Fig. 15.1) instead of inside or outside of the bounding box as in a regular frame.
| 15.3.1 Adding LabelFrame Objects | ||
| 15.3.2 LabelFrame Types | ||
| 15.3.3 Attributes | ||
| 15.3.4 Remarks |
To add a labelframe to a form you use the routine
FL_OBJECT *fl_add_labelframe(int type, FL_Coord x, FL_Coord y,
                             FL_Coord w, FL_Coord h, const char *label);
|
The meaning of the parameters is as usual except that the frame is
drawn outside of the bounding box (so a flat box of the same size just
fills the inside of the frame without any gaps). The label is by
default placed on the upper left hand part of the frame. Its position
can changed (within limits) via calls of
fl_set_object_lalign().
The following types are available:
FL_NO_FRAMEFL_UP_FRAMEFL_DOWN_FRAMEFL_BORDER_FRAMEFL_ENGRAVED_FRAMEFL_EMBOSSED_FRAMEFL_ROUNDED_FRAMEFL_OVAL_FRAMEAn elliptic box.
The first color in the call of fl_set_object_color()
controls the color of the frame if applicable. The second color
controls the background color of the label. Boxtype attribute does not
apply to the labelframe class
No interaction takes place with labelframes.
You can not draw a label inside or outside of the frame box. If you
try, say, by requesting FL_ALIGN_CENTER, the label is drawn
using FL_ALIGN_TOP_LEFT.
Text objects simply consist of a label possibly placed in a box.
| 15.4.1 Adding Text Objects | ||
| 15.4.2 Text Types | ||
| 15.4.3 Text Attributes | ||
| 15.4.4 Remarks |
To add a text to a form you use the routine
FL_OBJECT *fl_add_text(int type, FL_Coord x, FL_Coord y,
                       FL_Coord w, FL_Coord h, const char *label);
|
The meaning of the parameters is as usual. The label is by default placed flushed left in the bounding box.
Only one type of text exists: FL_NORMAL_TEXT.
To set or change the text shown, use
fl_set_object_label() or
fl_set_object_label_f().
Any boxtype can be used for text.
The first color argument (col1) of
fl_set_object_color() controls the color of the box the
text is placed into, the second (col2) is not used. The color of
the text itself is controlled by calls of
fl_set_object_lcolor() as usual.
If the text is to change dynamically, boxtype NO_BOX should
not be used for the object.
No interaction takes place with text objects.
Don't use boxtype FL_NO_BOX if the text is to change
dynamically. Note that there is almost no difference between a box
with a label and a text. The only difference lies in the position
where the text is placed and the fact that text is clipped to the
bounding box. Text is normally placed inside the box at the left side.
This helps you putting different lines of text below each other.
Labels inside boxes are default centered in the box. You can change
the position of the text inside the box using the routine
fl_set_object_lalign(). In contrast to boxes different
alignments for text always place the text inside the box rather than
outside the box.
A bitmap is a simple bitmap shown on a form.
| 15.5.1 Adding Bitmap Objects | ||
| 15.5.2 Bitmap Types | ||
| 15.5.3 Bitmap Interaction | ||
| 15.5.4 Other Bitmap Routines | ||
| 15.5.5 Bitmap Attributes | ||
| 15.5.6 Remarks |
To add a bitmap to a form you use the routine
FL_OBJECT *fl_add_bitmap(int type, FL_Coord x, FL_Coord y,
                         FL_Coord w, FL_Coord h, const char *label);
|
The meaning of the parameters is as usual. The label is by default placed below the bitmap. The bitmap is empty on creation.
Only the type FL_NORMAL_BITMAP is available.
No interaction takes place with a bitmap. For bitmaps that interact see Adding Button Objects, on how to create a button with a bitmap on top of it. (You can also place a hidden button over it if you want something to happen when pressing the mouse on a static bitmap.)
To set the actual bitmap being displayed use
void fl_set_bitmap_data(FL_OBJECT *obj, int w, int h,
                         unsigned char *bits);
void fl_set_bitmap_file(FL_OBJECT *obj, const char *file);
|
bits contains the bitmap data as a character string.
file is the name of the file that contains the bitmap data. A
number of bitmaps can be found in `/usr/include/X11/bitmaps' or
similar places. The X program bitmap can be used to create
bitmaps.
Two additional routines are provided to make a Bitmap from a bitmap file or data
Pixmap fl_read_bitmapfile(Window win, const char *filename,
                          unsigned *width, unsigned *height,
                          int *hotx, int *hoty)
Pixmap fl_create_from_bitmapdata(Window win, const char *data,
                                 int width, int height);
|
where win is any window ID in your application and the other
parameters have the obvious meanings. If there is no window created
yet, the return value of fl_default_window() may be used.
Note: bitmaps created by the above routines have a depth of 1 and
should be displayed using XCopyPlane().
The label color as set by fl_set_object_lcolor() controls
both the foreground color of the bitmap and the color of the label
(i.e., they are always identical).
The first color argument (col1) to
fl_set_object_color() sets the background color of the
bitmap (and the color of the box), the second (col2) is not
used.
See `demo33.c' for a demo of a bitmap.
A pixmap is a simple pixmap (color icon) shown on a form.
| 15.6.1 Adding Pixmap Objects | ||
| 15.6.2 Pixmap Types | ||
| 15.6.3 Pixmap Interaction | ||
| 15.6.4 Other Pixmap Routines | ||
| 15.6.5 Pixmap Attributes | ||
| 15.6.6 Remarks |
To add a pixmap to a form use the routine
FL_OBJECT *fl_add_pixmap(int type, FL_Coord x, FL_Coord y,
                         FL_Coord w, FL_Coord h, const char *label)
|
The meaning of the parameters is as usual. The label is by default placed below the pixmap. The pixmap is empty on creation.
Only the type FL_NORMAL_PIXMAP is available.
No interaction takes place with a pixmap. For pixmap that interacts see Adding Button Objects, on how to create a button with a pixmap on top of it. (You can also place a hidden button over it if you want something to happen when pressing the mouse on a static pixmap.)
A pixmap file (usually with extension .xpm) is an ASCII file
that contains the definition of the pixmap as a char pointer
array that can be included directly into a C (or C++) source file.
To set the actual pixmap being displayed, use one of the following routines:
void fl_set_pixmap_file(FL_OBJECT *obj, const char *file); void fl_set_pixmap_data(FL_OBJECT *obj, char **data); |
In the first routine, you specify the pixmap by the filename
file that contains it. In the second routine, you
#include the pixmap at compile time and use the pixmap data (an
array of char pointers) directly. Note that both of these
functions do not free the old pixmaps associated with the object. If
you're writing a pixmap browser type applications, be sure to free the
old pixmaps by calling
void fl_free_pixmap_pixmap(FL_OBJECT *obj); |
on the pixmap object prior to calling these two routines. This function, in addition to freeing the pixmap and the mask, also frees the colors the pixmap allocated.
To obtain the pixmap ID currently being displayed, the following routine can be used
Pixmap fl_get_pixmap_pixmap(FL_OBJECT *obj, Pixmap *id,
                            Pixmap *mask);
|
In some situations, you might already have a pixmap resource ID,
e.g., from fl_read_pixmapfile() (see below in the
"Remarks" subsection). Then you can use the following routine to
change the the pixmap
void fl_set_pixmap_pixmap(FL_OBJECT *obj, Pixmap id,
                          Pixmap mask);
|
where mask is used for transparency (see
fl_read_pixmapfile()). Use 0 for mask if no special
clipping attributes are desired.
This routine does not free the pixmap ID nor the mask already
associated with the object. Thus if you no longer need the old
pixmaps, they should be freed prior to changing the pixmaps using
the function fl_free_pixmap_pixmap().
Pixmaps are by default displayed centered inside the bounding box. However, this can be changed using the following routine
void fl_set_pixmap_align(FL_OBJECT *obj, int align,
                         int dx, int dy);
|
where align is the same as that used for labels, see section Label Attributes and Fonts for a list. dx and dy are extra
margins to leave in addition to the object border width. By default,
dx and dy are set to 3. Note that although you can place
a pixmap outside of the bounding box, it probably is not a good idea.
By default if a pixmap has more colors than that available in the colormap, the library will use substitute colors that are judged "close enough". This closeness is defined as the difference between the requested color and the color found being smaller than some pre-set threshold values between 0 and 65535 (0 means exact match). The default thresholds are 40000 for red, 30000 for green and 50000 for blue. To change these defaults, use the following routine
void fl_set_pixmap_colorcloseness(int red, int green, int blue); |
The following routines may be handy for reading a pixmap file into a pixmap
Pixmap fl_read_pixmapfile(Window win, const char *filename,
                          unsigned *width, unsigned *height,
                          Pixmap *shape_mask, int *hotx, int *hoty,
                          FL_COLOR tran);
|
where win is the window in which the pixmap is to be displayed.
If the window is yet to be created, you can use the default window,
returned by a call of fl_default_window(). Parameter
shape_mask is a pointer to an already existing Pixmap,
which, if not NULL, is used as a clipping mask to achieve
transparency. hotx and hoty are the center of the pixmap
(useful if the pixmap is to be used as a cursor). Parameter
tran is currently not used.
If you already have the pixmap data in memory, the following routine can be used
Pixmap fl_create_from_pixmapdata(Window win, char **data,
                                 unsigned *width, unsigned *height,
                                 Pixmap *shape_mask, int *hotx,
                                 int *hoty, FL_COLOR tran);
|
All parameters have the same meaning as for fl_read_pixmapfile.
Note that the Forms Library handles transparency, if specified in the
pixmap file or data, for pixmap and pixmapbutton objects. However,
when using fl_read_pixmapfile() or
fl_create_from_pixmapdata(), the application programmer
is responsible to set the clip mask in an appropriate GC.
Finally there is a routine that can be used to free a Pixmap
void fl_free_pixmap(Pixmap id); |
You will need the XPM library (version 3.4c or later)m developed by Arnaud Le Hors and Groupe Bull, to use pixmaps. The XPM library is avalialble as a package for most distributions, but can also be obtained from many X mirror sites, e.g., via anonymous FTP from (ftp://ftp.x.org/contrib/libraries/. Its home page is http://old.koalateam.com/lehors/xpm.html.
A clock object simply displays a clock on the form
| 15.7.1 Adding Clock Objects | ||
| 15.7.2 Clock Types | ||
| 15.7.3 Clock Interaction | ||
| 15.7.4 Other Clock Routines | ||
| 15.7.5 Clock Attributes | ||
| 15.7.6 Remarks |
To add a clock to a form you use the routine
FL_OBJECT *fl_add_clock(int type, FL_Coord x, FL_Coord y,
                        FL_Coord w, FL_Coord h, char label[])
|
The meaning of the parameters is as usual. The label is placed below the clock by default.
The following types are available:
No interaction takes place with clocks.
To get the displayed time (local time as modified by the adjustment described below) use the following routine
void fl_get_clock(FL_OBJECT *obj, int *h, int *m, int *s); |
Upon function return the parameters are set as follows: h is
between 0-23, indicating the hour, m is between 0-59, indicating
the minutes, and s is between 0-59, indicating the seconds.
To display a time other than the local time, use the following routine
long fl_set_clock_adjustment(FL_OBJECT *obj, long adj); |
where adj is in seconds. For example, to display a time that is
one hour behind the local time, an adjustment of 3600 can be
used. The function returns the old adjustment value.
By default, the digital clock uses 24hr system. You can switch the display to 12hr system (am-pm) by using the following routine
void fl_set_clock_ampm(FL_OBJECT *obj, int yes_no) |
Never use FL_NO_BOX as the boxtype for a digital clock.
The first color argument (col1) of
fl_set_object_color() controls the color of the
background, the second (col2) is the color of the hands.
See `flclock.c' for an example of the use of clocks. See section Misc. Functions, for other time related routines.
The chart object gives you an easy way to display a number of different types of charts like bar-charts, pie-charts, line-charts etc. They can either be used to display some fixed chart or a changing chart (e.g., a strip-chart). Values in the chart can be changed and new values can be added which makes the chart move to the left, i.e., new entries appear at the right and old entries disappear at the left. This can be used to e.g., monitor processes.
| 15.8.1 Adding Chart Objects | ||
| 15.8.2 Chart Types | ||
| 15.8.3 Chart Interaction | ||
| 15.8.4 Other Chart Routines | ||
| 15.8.5 Chart Attributes | ||
| 15.8.6 Remarks |
To add a chart object to a form use the routine
FL_OBJECT *fl_add_chart(int type, FL_Coord x, FL_Coord y,
                        FL_Coord w, FL_Coord h, const char *label);
|
It shows an empty box on the screen with the label below it.
The following types are available:
FL_BAR_CHARTFL_HORBAR_CHARTFL_LINE_CHARTFL_FILLED_CHARTFL_SPIKE_CHARTFL_PIE_CHARTFL_SPECIALPIE_CHARTA pie-chart with displaced first item
All charts except pie-charts can display positive and negative data.
Pie-charts will ignore values that are less then or equal to 0. The
maximum number of values displayed in the chart can be set using the
routine fl_set_chart_maxnumb(). The argument must be not
larger than FL_CHART_MAX which currently is 512. Switching
between different types can be done without any complications.
No interaction takes place with charts.
There are a number of routines to change the values in the chart and to change its behavior. To clear a chart use the routine
void fl_clear_chart(FL_OBJECT *obj); |
void fl_add_chart_value(FL_OBJECT *obj, double val,
                        const char *text, FL_COLOR col);
|
Here val is the value of the item, text is the label to
be associated with the item (can be empty) and col is an index
into the colormap (FL_RED etc.) that is the color of this item.
The chart will be redrawn each time you add an item. This might not be
appropriate if you are filling a chart with values. In this case put
the calls between calls of fl_freeze_form() and
fl_unfreeze_form().
By default, the label is drawn in a tiny font in black. You can change the font style, size or color using the following routine
void fl_set_chart_lstyle(FL_OBJECT *obj, int fontstyle); void fl_set_chart_lsize(FL_OBJECT *obj, int fontsize); void fl_set_chart_lcolor(FL_OBJECT *obj, FL_COLOR color); |
Note that fl_set_chart_lcolor() only affects the label
color of subsequent items, not the items already created.
You can also insert a new value at a particular place using
void fl_insert_chart_value(FL_OBJECT *obj, int index,
                           double val, const char *text,
                           FL_COLOR col);
|
index is the index before which the new item should be
inserted. The first item is number 1. So, for example, to make a
strip-chart where the new value appears at the left, each time insert
the new value before index 1.
To replace the value of a particular item use the routine
void fl_replace_chart_value(FL_OBJECT *obj, int index,
                            double val, const char *text,
                            FL_COLOR col);
|
Here index is the index of the value to be replaced. The first
value has an index of 1, etc.
Normally, bar-charts and line-charts are automatically scaled in the vertical direction such that all values can be displayed. This is often not wanted when new values are added from time to time. To set the minimal and maximal value displayed use the routine
void fl_set_chart_bounds(FL_OBJECT *obj, double min, double max)' |
To return to automatic scaling call it with both min and
max being set to 0.0. To obtain the current bounds, use
the following routine
void fl_get_chart_bounds(FL_OBJECT *obj, double *min, double *max)' |
Also the width of the bars and distance between the points in a line-chart are normally scaled. To change this use
void fl_set_chart_autosize(FL_OBJECT *obj, int autosize); |
with autosize being set to false (0). In this case the width of
the bars will be such that the maximum number of items fits in the
box. This maximal number (defaults to
FL_CHART_MAX) can be changed
using
void fl_set_chart_maxnumb(FL_OBJECT *obj, int maxnumb); |
where maxnumb is the maximal number of items to be displayed,
which may not be larger than FL_CHART_MAX.
Don't use boxtype FL_NO_BOX for a chart object if it changes
value.
Normally, for bar and line chart a baseline is drawn at 0. This can be switched on and off by the function
void fl_set_chart_baseline(FL_OBJECT *ob, int yes_no); |
The first color argument (col1) to
fl_set_object_color() controls the (background) color of
the box, the second (col2) the color of the baseline.
See `chartall.c' and `chartstrip.c' for examples of the use of chart objects.
| [ << ] | [ >> ] | [Top] | [Contents] | [Index] | [ ? ] |
This document was generated by Jens Thoms Toerring on January 5, 2014 using texi2html 1.82.